September 29, 2011

Rainbow Cupcakes!

Hi guys! I took a break from cookie making this month to relax, clear my head and give my poor hands a break from squeezing those little icing bags and bottles. (I don’t know how every cake/cookie decorator in the world doesn’t have carpal tunnel. Geesh!) However, a month is a long time and I just couldn’t stay out of the kitchen a minute longer!(and it’s also the last week before my month long sugar fast….I know, I’m sure you’re thinking I’m crazy, but the pros definitely outweigh the cons. I was reading Pioneer Woman’s blog the other day and she mentioned she was going to try it, so I thought, hey, why not? Who wouldn’t want prettier skin, shinier hair and loads of natural energy, not to mention a bit of weight loss! ;) And a month isn’t too terribly long, but then I realized I picked the world’s worst month to try this little challenge. EEK! Halloween! What was I thinking!?! But maybe it’s the best time to do it…..I’ll let you know how it went on November first. Anyhoo, back to the cupcakes.

We’ve had one of those Betty Crocker Cupcakes and Cakes mini books floating around the office for a while and I’ve been eyeballing a few I wanted to test out. One of the girls at the work is leaving, so of course we had a little party and she decided she wanted the rainbow cupcakes as dessert. I hopped right on board! I love rainbows and these looked fairly easy to make!


Ingredients:

1 Box Betty Crocker Super Moist white cake mix

Water, vegetable oil and egg whites called for on cake mix box

Food Colors (red, orange, yellow, green and blue)

2 Containers (1lb each) Betty Crocker Rich & Creamy white frosting (I accidentally grabbed the whipped version and they turned out pretty well)

Orange Extract (This was my addition, so you can substitute any extract flavoring you want or leave it out.)


Cupcake Instructions:

1. Heat oven to 350F (325F for dark or nonstick pans).

2. Place paper baking cups in your cupcake pan. (The recipe says it will make 24 cupcakes, but I only got 18 out of mine.)

3. Make cake mix as directed on box for cupcakes, using water, oil and egg whites.

4. Add 2 tsp orange extract.

5. Divide batter evenly into 5 bowls.


6. Mix a different food color in each bowl.


7. Place 1 tsp of each color batter into each muffin cup, layering the colors in order of the rainbow. DO NOT STIR!!! They should be about ½ to ¾ of the way full.

(When I made mine I misread the directions and used a tablespoon instead, oops! But they turned out PERFECT, so I recommend using a tablespoon instead.)


8. Bake 15 to 20 minutes or until toothpick comes out clean.

9. Cool for 10 minutes. Transfer to cooling racks and let cool completely.

{Can you believe how perfectly poofy these suckers turned out?!? Me neither! My cupcakes are NEVER this pretty...okay, I'm done ranting! :) }


Frosting Instructions:


1. Spoon frosting out of both containers into a medium bowl.


2. Mix in 2 tsp orange extract.

3. Divide frosting evenly between 3 small bowls.


4. Tint one red, one yellow and one blue.

5. Refrigerate for about 30 minutes.

6. In a large disposable decorating bag fitted with a #6 star tip (I used a larger tip, I believe it was a Wilton 1M)

7. Spoon each color of frosting side by side in bag, alternating colors and working up from the tip of the bag. Don’t stir them together.

(Sorry there's no picture. It was quite messy because I filled my bag with a little too much frosting. I was just a bit excited to use more than one color on a cupcake.)

8. Twist the top of the bag closed and start frosting. You might get a lot of one color when you first start but the others will eventually come out, just keep squeezing!

9. You want to start on the outside edge and swirl in towards the center ending in a small peak.


I think the colors on these are to die for! The computer just doesn't do them justice.

June 29, 2011

Birthday Goats!

I was asked last week to make birthday cookies for one of my dad's friends. I was really excited to start the project because he uttered the best phrase a cookier could ever hear..."Just be creative!". I love it! You can pretty much do anything and are not restricted to any preconceived ideas. However, I could not think for the life of me what to make. Do I go funky, cutesy, age appropriate or traditional? Then I remembered they raise goats! She is in love with all of the baby goats and goes out to see them daily. Why don't I do cookies that look like the all of the goats and put their names on each of them.


I love this name for a goat! Too cute!

I decided to go a little more cartoony than realistic. I ended up liking the full bodied goats better than the portrait style ones, but what can you do? :)

Sorry about the delayed blog posts lately....life has been wild lately!

Thanks for reading!

June 4, 2011

The BEST chocoloate roll out cookie recipe!

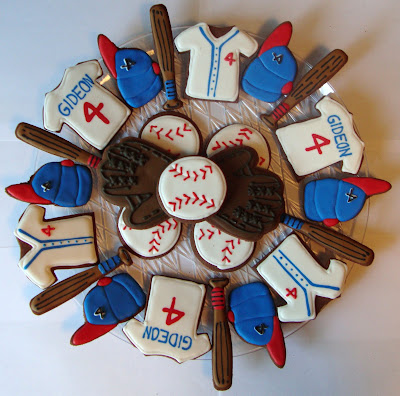
While perusing the baking and cookier blogs I stumbled across this chocolate cookie recipe. Don't get me wrong, I love, love, love my traditional sugar cookie recipe, but always thought having another option would just be nice to have if I wanted to switch things up and get a little CRAZY! ;) What initially drew me to LilaLoa's blog were her amazing Easter cookies. The colors were just stunning!...and these little chickies! And then there it was. After reading practically every blogpost she had written, I found it!{Insert angels singing} Thank goodness I did because my last cookie request was for chocolate baseball cookies for a 4 year old's birthday. It had to be cookie destiny! :)

The End-All for Chocolate Cookies Recipe:

1 cup Butter
¼ cup Shortening
1 ½ cups Granulated sugar
2 Eggs
1 tsp Vanilla
1 tsp Salt
¾ tsp Baking powder
2/3 cup Cocoa
3 or 3 ½ cups Flour

Cream butter, shortening and sugar together. Add eggs and vanilla. Mix well. Add baking powder and salt and mix again. Stir in the cocoa until well blended. Add flour 1 cup at a time. *IF YOU ARE GOING TO MAKE COOKIES RIGHT AWAY, ADD 3 ½ cups flour. If you are going to “chill” the dough, or just wait for another day to make your cookies, STOP AT 3 cups. It will be totally soft and look all wrong and you will want to ignore the recipe completely and add more flour, but DON’T DO IT. Practice self-restraint. You will be glad you did and I will be proud of you. **Roll out on a lightly floured surface. Bake at 375 F for 6 ½ minutes.

*I added 3 1/2 cups of flour and put mine in the freezer to chill (see next asterisk) and it worked perfectly.

**I don't roll my cookies out with flour. I sandwich a disc of dough between two sheets of wax paper and then place in the freezer on an extra cookie sheet for about 8-10 min. When you pull it out all you have to do is peel the top sheet off and then cut your shapes! The cleanup is ridiculously easy! I've even started doing this with my pie crusts. Nothing beats baking and then have a 5 minute cleanup when you're through! :)


Not only were these cookies tasty, but they also held their shape like nobody's business! I've never seen cookies come out of the oven with such crisp sharp edges!

March 6, 2011

St. Patrick's Day!

St. Patrick's Day is just around the corner! And what do you know, I actually got these cookies done and posted before the holiday flew by! ;)

I was inspired by Sugarbelle to make these leprechaun cookies. I tell you what, everytime I read one of her posts I learn something new! She is full of inspiration and new ideas! In the leprechaun post she showed how to look at your existing cutters and think out of the box. You don't always have to have the exact cutter to make a specific shape. Use your imagination and see what you come up with. Without further ado, here's what I ended up coming up with.


This beer glass is actually a foot with the rounded bottom trimmed off.


I added gold pearl dust to the "Pot 'O' Gold" just for an added bit of shimmer.


I couldn't help but sing the Ducktales theme song while I made these!...Pretty sure I'm never going to grow up! :)

********************************************

All of these sweets will be on their way over to Afghanistan in a few days.(Hopefully they make it all in one piece!) My cousin, Amy, is stationed there until sometime this summer. It's the least I could do in return for everything she does. She is an incredible, smart, funny, caring and loving woman. She's a wife, a mom, a sister and a daughter. She does so much, not only for her family but for our country. She just got promoted to Sergant First Class and we all couldn't be happier for her!


This is what her new patch will look like for her uniform.


This is when she Re-upped this last year...right before she jumped out of a plane!!!


And this is us as kids! (My grandma always bought us matching EVERYTHING!) Oh boy, were we stinkers! (Can't you just tell by the looks on our faces?)
Love ya girly, and I can't wait to see you this summer!

February 12, 2011

Valentine's Slumber Party


Last weekend I had the pleasure of having my niece, Aletha, over for a slumber party. There was no baking involved, but these craft ideas were too cute not to share! Since it was so close to Valentine’s day, we decided to make a few Valentine’s crafts. The first project we made were “Gumball Necklaces”. I spotted these babies at onecharmingparty.com. I immediately wanted to try them and what better excuse than a sleep over with a seven year old! They required a little more work than I initially planned on, but were totally worth it in the end. These would be great as a craft/party favor at a birthday party!

Materials:
-Gumballs (Large and/or Small) – I couldn’t find the large ones on such short notice so we made do with smaller ones….which still turned out pretty cute!
-Ribbon – ½ inch or smaller.
-Metal Skewer
-Power Drill – I ended up needing to use a drill bit for the smaller gumballs. Just make sure you put a stack of magazines under where you’re drilling and be sure that the drill bit makes a big enough whole to thread the ribbon through. (I learned this the hard way by drilling them twice, once with a smaller size and then again with the next size up.)
-Large Needle – Make sure it’s big enough to thread a ribbon through.


Instructions:
1. Using the metal skewer, pierce one side of the large gumball. Hold the top of the gumball steady as you guide the skewer. This will prevent the skewer from slipping off the slick surface of the gumball.

2. Flip the gumball over and pierce another hole directly opposite the first hole. If you try to poke a hole straight through both sides at once, the gumball will crack.

3. For the smaller gumballs make a small notch with the skewer so the drill wouldn’t slip off the side of the gumball. Position the drill at a 90 degree angle to the gumball and drill. Make sure you drill completely through the gumball before removing the drill, or else you will crack the opposite side of the gumball as you push the drill bit through. ( I’m sure you could use the drill for both the large and small gumballs. The larger ones tend to be a little more soft, so be careful not to press too hard and squash it as you’re drilling.)


4. Use a large needle to thread the ribbon through the gumballs. Thinner ribbon is easier to string. Tie a knot between each gumball as you string it.


********************************************

Our second project was a “Yarn Puff Headband”. I was just as excited to make these as I was for the Gumball Necklaces. They are incredibly easy to make and there are endless possibilities to the combinations you can make.


Materials:
-Yarn
– A multi colored skein works well, but you can use any type you’d like.
-Scissors
-Buttons – Medium to large size ones work the best.
-Elastic Headbands
-Large Needle – It just needs to be big enough to thread a piece of yarn through the ‘eye’.


Instructions:
1. Wrap the yarn around your first three fingers about fifty times. Be sure not to wrap it too tight because you will need to be able to wiggle your fingers out when finished. The more times you wrap the fuller and fluffier your “puff” will be. (If kids are making these with you, just lower the number of times they wrap the yarn around their little fingers….maybe 30-40.)


2. When you’ve reached your desired amount of loops, snip your yarn from the skein and delicately slide your fingers from the ring, keeping it intact.

3. Tie a piece of yarn large enough to fit around the middle of the ring. Make sure you tie it tight because this is what holds the “puff” together.


4. Snip each of the loops and WAH-LAH, you’re “puff” is done! These could be used for all sorts of decorations….string them like garland, through them in a bowl, scatter them around a party table…the potential uses are never-ending.


Now for the headband:

5. Cut a piece of yarn long enough to thread through your button and still be able to tie around the “puff”. Usually about 8-10 inches…..It’s always better to have too much than too little.

6. Thread the yarn through the button making sure you leave enough of a tail (about 4 to 5 inches) to be able to tie around the “puff” when you’re done.

7. Now tie the button onto your “puff” around the same spot the tied your original knot to secure the “puff” together.

8. Now tie your “puff” around the elastic headband. Ta-Da! You’ve got a trendy, custom made hair accessory.


**We of course had to make a matching one for Rebecca, her American Girl doll. Just make your “puff” a little bit smaller and replace the headband with a regular ponytail holder.


December 4, 2010

Rugelach!.....Oh Rugelach! Where have you been all my life?

I think I'm in love! In the midst of all of the year end hustle and bustle I decided to branch out from the normal Holiday treats and try something new. A few weeks ago my friend Karli asked me if I had any good recipes for Rugelach. I had honestly never heard of it but found a recipe that looked absolutely scrumptious. However, it had an ingredient that isn't sold in most stores. Needless to say I went on the hunt for a different but equally tasty recipe.(I think I'm still going to order it some day and try it out.) I found this recipe the other day while looking on Yahoo! Shine in the Food section. Like I said earlier, I had never heard about and/or tried Rugelach and can I just say it's now my new favorite confection! It's everything you want in a sweet little treat. It has lite, flaky dough, tangy fruit filling, crunchy nuts and a bit of chocolate too! So, without further ado....


RUGELACH

For the dough:
12 ounces (1 and a 1/2 packages) cream cheese at room temperature
2 sticks unsalted butter at room temperature
1/2 teaspoon kosher salt
6 tablespoons sugar
1 teaspoon vanilla
2 1/2 cups unbleached all-purpose flour

For the filling:
1 cup mini chocolate chips
1/2 cup brown sugar
1/2 teaspoon cinnamon
1 cup mixed nuts, such as pecans or almonds
1/2 cup apricot jam


1. In the bowl of an electric mixer fitted with the paddle attachment, cream butter, cream cheese, and sugar. Add salt and vanilla, and mix until light and well blended. Add flour and mix until just incorporated.

2. Divide dough into four equal parts. Form the parts in balls and wrap each in plastic wrap. Refrigerate for at least one hour.

3. In a food processor fitted with the blade, pulse together brown sugar, 1/2 teaspoon cinnamon, and nuts until the nuts are finely chopped. Set aside.

4. Preheat the oven to 375 degrees.

5. Roll one ball of dough until it is about 8-9 inches in diameter. I like to use GLAD Press 'n Seal wrap when rolling out any kind of dough. Just pull a large enough sheet out to give yourself enough room to roll out your dough for whatever you're making. Place the tacky side on the counter and press one half of it down. Place the ball of dough on the side that is stuck to the counter and fold the other half of the Press 'n Seal wrap over.


6. Warm the jam in the microwave for about 30 seconds. Spread 2 tablespoons of it on the dough, followed by 1/3 cup of the brown sugar mixture, and 1/4 cup of the mini chocolate chips. With a rolling pin, gently press the filling into the dough.


7. Use a pizza cutter or a sharp knife to cut the round into 12 equal wedges like a pizza. Starting with the outside of each wedge, roll up and place each cookie, with the point on the bottom, on a cookie sheet lined with parchment paper. (I used my Silpat baking mat instead of parchment paper.)


8. Mix together cinnamon and sugar in a small bowl. Brush cookies with egg wash and sprinkle with cinnamon and sugar mixture.

9. Bake at 375 degrees for 10-15 minutes, or until the corners start to brown. Let cool for 5 minutes before transfering to a cooling rack.


This recipe has definitely made in to my Holiday Cookie repetoire and hopefully you'll give it a shot too! :)

October 29, 2010

Happy Halloween!

With all of the decorations and costumes in all of the stores this season, I couldn't stop my creative side from catching the Halloween bug! I was inspired last week to bake a few goodies for my co-workers and the ladies at my mom's office. This post is a little different from the others. I've decided to do more of a tutorial than just pretty pictures. :) The recipes I used for the cookies and icing are from this post. I hope you get inspired to try them yourself and see how easy decorating cookies can be!

FALL COOKIES: (for the office ladies)


Pumpkin


1. Pipe the stem with Wilton icing tip #3. Let dry. (about 5-10 min.)
2. Fill in the pumpkin with tip #3. You can outline the edge of the pumpkin to create a border and then fill in the middle. Let dry. (about 5-10 min.)
3. Pipe the lines on with tip #3. Let dry. (about 5-10 min.)
4. Pip on the vines with tip #1. Let dry. (about 5-10 min.)


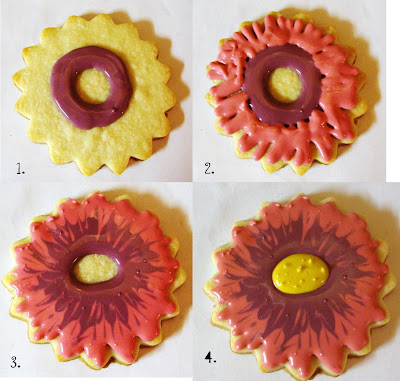
Mum


1. Pipe the inner circle with tip #3.
2. Pipe the outer circle in a zig zag to create the edges of the petals with tip #3.
3. Before the icing has time to set and dry drag a toothpick from the inner circle to the outer circle to creat the two toned flower design. Let dry. (about 5-10 min.)
4. Fill in the middle with yellow with Wilson icing tip #3. Use the icing tip
to make the points in the middle. To do this you just put the tip straight down in the icing and lift straight up. It will make small points that should dry to look like the center of a flower.


Sunflower


I completely forgot to take "Step shots" of this one.
1. Pipe the petals with tip #3. Be sure and do every other one and let them set/dry before you fill in the rest of the petals. If you do them all at once the royal icing will run together and you'll have one giant sloppy flower.
2. Pipe the middle with tip #3, but like the petals, do every other one or else you won't have the defined sunflower seed look.


Corn on the Cob


1. Pipe the green icing in the shape of corn husks using Wilson icing tip #3. Let dry. (about 5-10 min.)
2. Pipe the rows for the corn using tip #1. Let dry. (about 5-10 min.)
3. Pipe the corn husk details using tip #3. Let dry. (about 5-10 min.)
4. Pipe beads of icing in brown and tan to look like corn pieces. Let dry. (about 5-10 min.)
5. Continue to fill in the corn rows with yellow. Be sure not to place two beads next to each other in between piping or else they will run together and create a pool instead of the individual corn pieces. Let dry. (about 5-10 min.)


HALLOWEEN COOKIES: (for the co-workers)


Black Cat


1. Pipe the border of the cat with Wilson icing tip #1. Let dry. (about 5-10 min.)
2. Fill in the center. Let dry. (about 5-10 min.)
3. Pipe the green eyes with tip #3 and immediately pipe in the pupils with tip #1. Let dry. (about 5-10 min.)


Jack'O'Lantern


1. Pipe the stem on with Wilson icing tip #3. Let dry. (about 5-10 min.)
2. Pipe the face of the Jack'O'Lantern with tip #1. Let dry. (about 5-10 min.)
3. Pipe the border of the pumpkin with icing tip #3. Let dry. (about 5-10 min.)
4. Fill in the middle of the pumpkin. Be careful not to push icing on top of your Jack'O'Lantern face. Let dry. (about 5-10 min.)
5. Pipe the lines of the pumpkin with tip #3. Let dry. (about 5-10 min.)


Ghost


I completely forgot to take "Step shots" of this one too.
1. Pipe the border with Wilson icing tip #3. Let dry. (about 5-10 min.)
2. Fill in the center of the ghost. Let dry. (about 5-10 min.)
3. Pipe the details of the face with icing tip #1. Let dry. (about 5-10 min.)


Bats


1. Pipe the border with Wilson icing tip #1. Let dry. (about 5-10 min.)
2. Fill in the center. Let dry. (about 5-10 min.)
3. Pipe the eyes with tip #3 and then immediately pipe the pupil with tip #1. Let dry. (about 5-10 min.)
4. Pipe the mouth and fangs with tip #1. Let dry. (about 5-10 min.)
5. Pipe the hairy body with tip #1. Let dry. (about 5-10 min.)
6. Pipe the details of the wings with tip #1. Let dry. (about 5-10 min.)