With all of the decorations and costumes in all of the stores this season, I couldn't stop my creative side from catching the Halloween bug! I was inspired last week to bake a few goodies for my co-workers and the ladies at my mom's office. This post is a little different from the others. I've decided to do more of a tutorial than just pretty pictures. :) The recipes I used for the cookies and icing are from
this post. I hope you get inspired to try them yourself and see how easy decorating cookies can be!
FALL COOKIES: (for the office ladies)
Pumpkin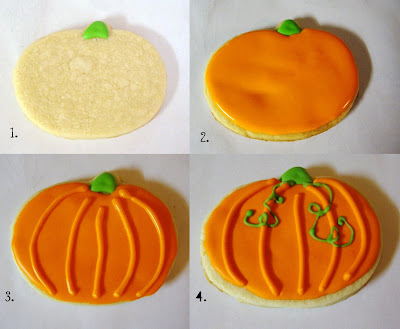
1. Pipe the stem with Wilton icing tip #3. Let dry. (about 5-10 min.)
2. Fill in the pumpkin with tip #3. You can outline the edge of the pumpkin to create a border and then fill in the middle. Let dry. (about 5-10 min.)
3. Pipe the lines on with tip #3. Let dry. (about 5-10 min.)
4. Pip on the vines with tip #1. Let dry. (about 5-10 min.)
Mum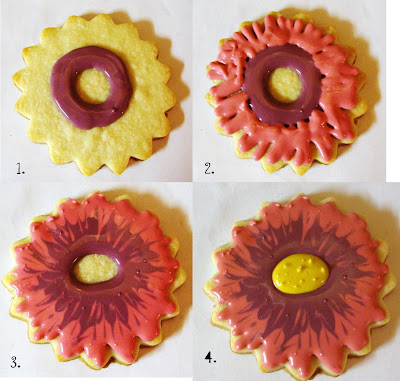
1. Pipe the inner circle with tip #3.
2. Pipe the outer circle in a zig zag to create the edges of the petals with tip #3.
3. Before the icing has time to set and dry drag a toothpick from the inner circle to the outer circle to creat the two toned flower design. Let dry. (about 5-10 min.)
4. Fill in the middle with yellow with Wilson icing tip #3. Use the icing tip
to make the points in the middle. To do this you just put the tip straight down in the icing and lift straight up. It will make small points that should dry to look like the center of a flower.
Sunflower.JPG)
I completely forgot to take "Step shots" of this one.
1. Pipe the petals with tip #3. Be sure and do every other one and let them set/dry before you fill in the rest of the petals. If you do them all at once the royal icing will run together and you'll have one giant sloppy flower.
2. Pipe the middle with tip #3, but like the petals, do every other one or else you won't have the defined sunflower seed look.
Corn on the Cob
1. Pipe the green icing in the shape of corn husks using Wilson icing tip #3. Let dry. (about 5-10 min.)
2. Pipe the rows for the corn using tip #1. Let dry. (about 5-10 min.)
3. Pipe the corn husk details using tip #3. Let dry. (about 5-10 min.)
4. Pipe beads of icing in brown and tan to look like corn pieces. Let dry. (about 5-10 min.)
5. Continue to fill in the corn rows with yellow. Be sure not to place two beads next to each other in between piping or else they will run together and create a pool instead of the individual corn pieces. Let dry. (about 5-10 min.)
HALLOWEEN COOKIES: (for the co-workers)
Black Cat
1. Pipe the border of the cat with Wilson icing tip #1. Let dry. (about 5-10 min.)
2. Fill in the center. Let dry. (about 5-10 min.)
3. Pipe the green eyes with tip #3 and immediately pipe in the pupils with tip #1. Let dry. (about 5-10 min.)
Jack'O'Lantern
1. Pipe the stem on with Wilson icing tip #3. Let dry. (about 5-10 min.)
2. Pipe the face of the Jack'O'Lantern with tip #1. Let dry. (about 5-10 min.)
3. Pipe the border of the pumpkin with icing tip #3. Let dry. (about 5-10 min.)
4. Fill in the middle of the pumpkin. Be careful not to push icing on top of your Jack'O'Lantern face. Let dry. (about 5-10 min.)
5. Pipe the lines of the pumpkin with tip #3. Let dry. (about 5-10 min.)
Ghost
I completely forgot to take "Step shots" of this one too.
1. Pipe the border with Wilson icing tip #3. Let dry. (about 5-10 min.)
2. Fill in the center of the ghost. Let dry. (about 5-10 min.)
3. Pipe the details of the face with icing tip #1. Let dry. (about 5-10 min.)
Bats
1. Pipe the border with Wilson icing tip #1. Let dry. (about 5-10 min.)
2. Fill in the center. Let dry. (about 5-10 min.)
3. Pipe the eyes with tip #3 and then immediately pipe the pupil with tip #1. Let dry. (about 5-10 min.)
4. Pipe the mouth and fangs with tip #1. Let dry. (about 5-10 min.)
5. Pipe the hairy body with tip #1. Let dry. (about 5-10 min.)
6. Pipe the details of the wings with tip #1. Let dry. (about 5-10 min.)


.JPG)


.JPG)
.JPG)
.JPG)
.JPG)